
 SysAdmin
 Magazine
 The Sysadmin Magazine team sysadmin.magazine@netwrix.com


Ryan Brooks
Product Evangelist

The Top 5 IT Security
Trends
for 2018
In 2017, the IT community was primarily focused on mitigating external threats, such as cloud hacks and state-sponsored cyber attacks. However, many of this year’s data breaches — notably Equifax and Anthem — were actually the result of insider misuse or human mistakes. These breaches clearly demonstrate that building even the most robust perimeter defense is not sufficient, since employees and contractors can pose an even bigger threat to cybersecurity than hackers do.
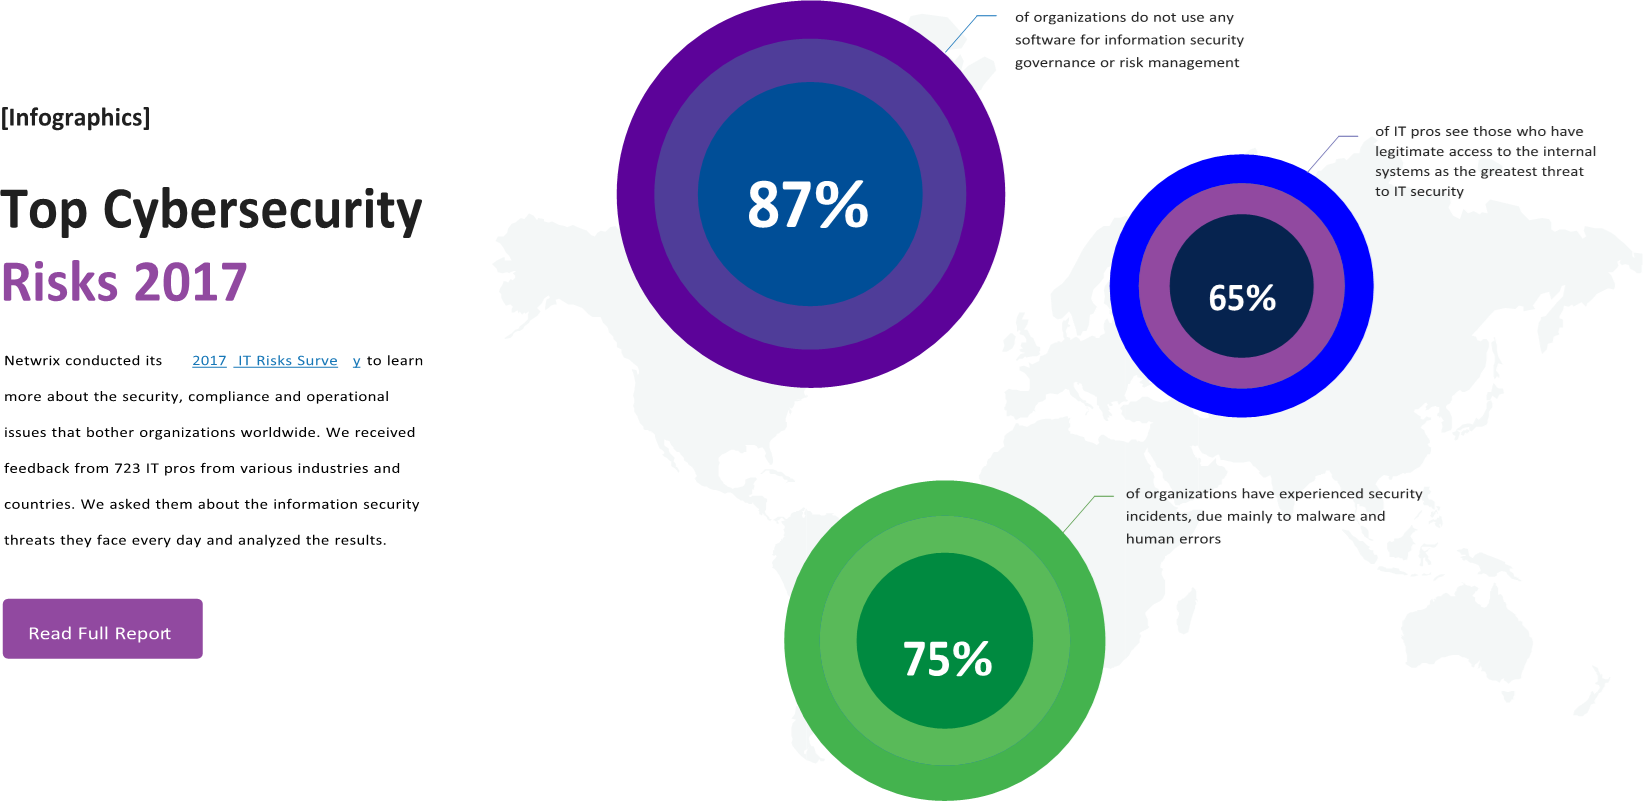
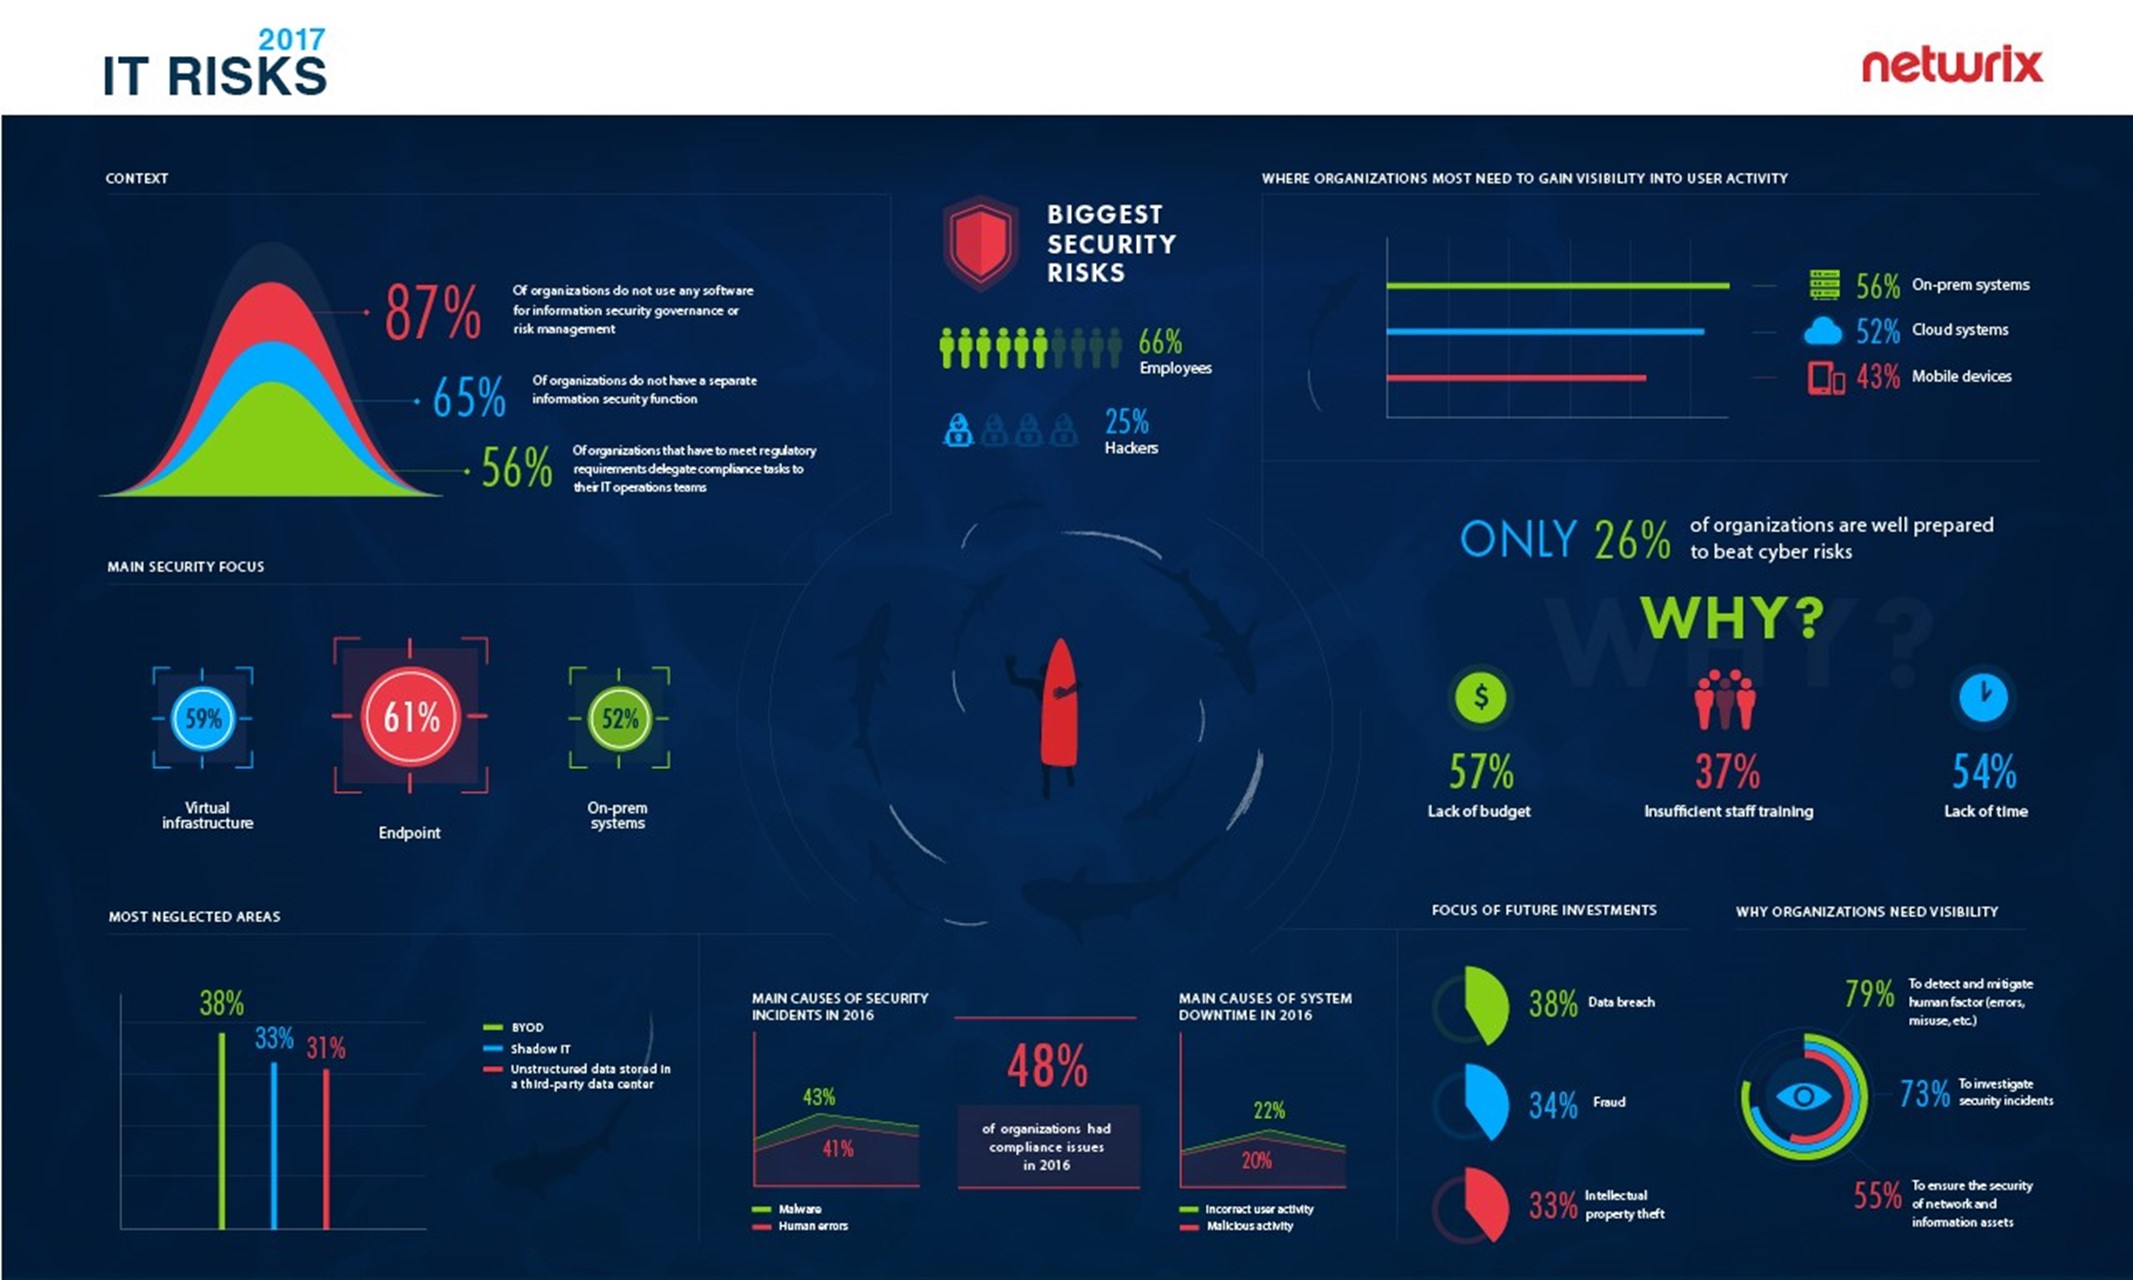
 Unfortunately, the 2017 IT Risks Survey by Netwrix discovered that many organizations still struggle
to gain visibility into user activities in their IT
environments, which leaves them helpless against insider breaches. Verizon’s 2017 Data Breach Investigation Report proves this statement, saying that employee data theft can take months or years to discover. The need to ensure data integrity forces organizations to be more vigilant and rethink their approaches to cybersecurity. Here are the top five IT security trends that will define the way organizations fight cybercrime in 2018:

Trend #1
Compliance will require more effort.
As compliance standards get stricter, and new ones are added, adhering to all their requirements is becoming even more challenging. For example, NIST Special Publication 800-171, which comes into force December 31, 2017, will regulate the protection of controlled unclassified information (CUI) in non-federal information systems and organizations, and the greatly anticipated General Data Protection Regulation (GDPR), which goes into effect in May 2018, will affect the ways every organization in the world that handles the data of European citizens must process, store and protect that data.
 GDPR will affect the ways every organization in the world that handles the data of European citizens must process, store and protect that data
These and other new protective measures, along with stricter penalties for non-compliance, will require businesses to revise their data privacy programs and put more effort into proving that all necessary controls are in place.

Trend #2
Advanced analytics will improve data security.
5
Many organizations use multiple security products, like SIEMs, antivirus software and data loss prevention (DLP) tools. However, these solutions generate large volumes of data, which makes it hard to spot the critical information that requires immediate attention. To gain a complete understanding of what is happening across the IT environments, organizations need advanced analytics tools that can process data from multiple sources and provide visibility into activities that could pose a threat to sensitive data. The growing adoption of technologies like user and entity behavior analytics (UEBA) will enable organizations to establish stricter control over their IT infrastructures and better understand their weak points, so they can fix security holes before a data breach occurs.

Trend #3
Vendors will create solutions tailored to different security needs.
The global cybersecurity market is evolving, and the number of solutions that address similar pain points differently is growing rapidly. Since the need for strong data protection practices is extremely high, vendors will start offering a more personalized approach to solving customers’ problems, taking
into account factors like IT infrastructure size and complexity, industry, and budget. The resulting customized approach to IT security will empower organizations to implement solutions tailored to their unique requirements, while small software providers focused on one particular area will get a chance to compete with larger but less flexible vendors by providing offerings that are more suitable for specific businesses.

Trend #4
The CARTA approach will improve decision-making.
In 2017, Gartner proposed a Continuous Risk and Trust Assessment Approach (CARTA) approach, which is based on the recognition that security is a continuous process of regular review, re-assessment and adjustment, rather than a set-it-and-forget-it thing. In 2018, CARTA approach has the potential to become a core strategy for organizations, defining how they evaluate and mitigate cyber risks. Real-time assessment of risk and trust in the IT environment enables companies to make better decisions regarding their security posture; the most common use case is granting additional access rights to users only after carefully studying the history of their actions in order to avoid privilege abuse.

Trend #5
Blockchain will be used for IT security.
 Blockchain might become a major security technology, especially for highly regulated industries like finance and law
One innovative approach to addressing the increasing number and sophistication of cyber threats is to use blockchain principles to strengthen security. Blockchain technology enables data to be stored in a decentralized and distributed manner, which means that instead of residing in one location, data is stored as an open source ledger. This prevents mass data hacking and enables organizations to prevent data tampering, since participants in the blockchain network would immediately spot any change in the ledger. Blockchain stands as a major technological leap in the security of sensitive information and might become a major security technology, especially for highly regulated industries like finance and law.
Although each organization has its own pain points and requires different frameworks to defend against outsider and insider attacks, there are clear trends. Businesses are ready to invest in better protection strategies, and vendors will take advantage of new technologies and create more customized solutions to better address specific business needs. As a result, organizations will become more proactive about securing confidential data, and insiders and hackers alike will find their work more difficult, because it will take more time and effort for them to steal corporate data.
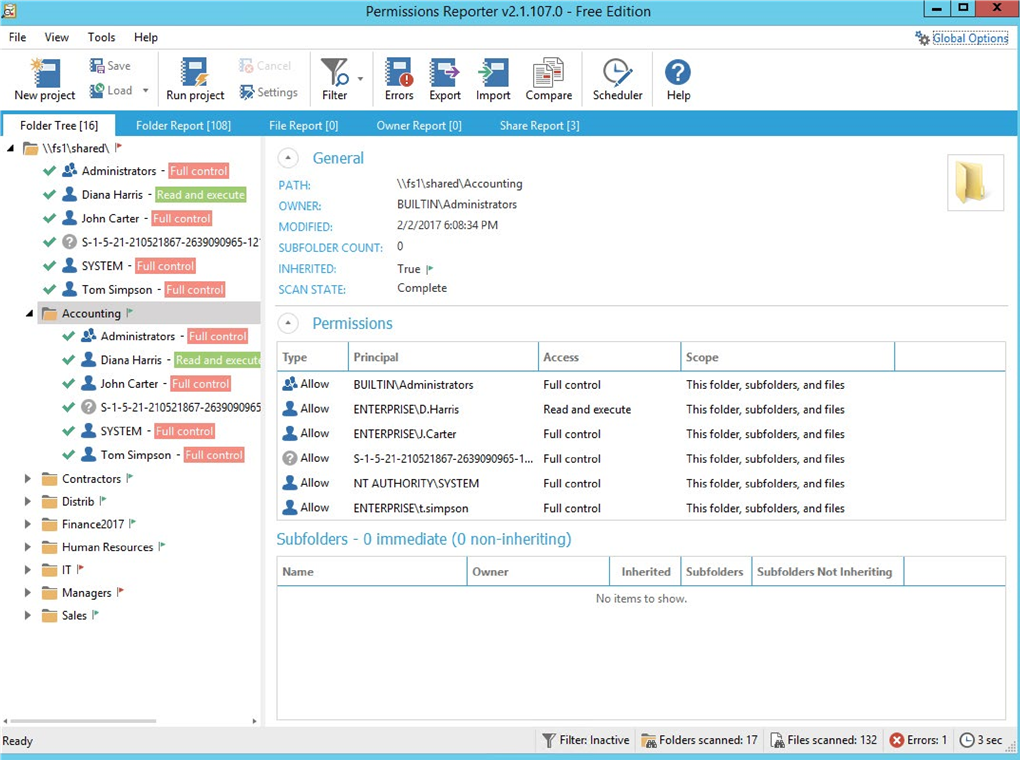
 Tool #1
NTFS Permissions
Reporter Free Edition
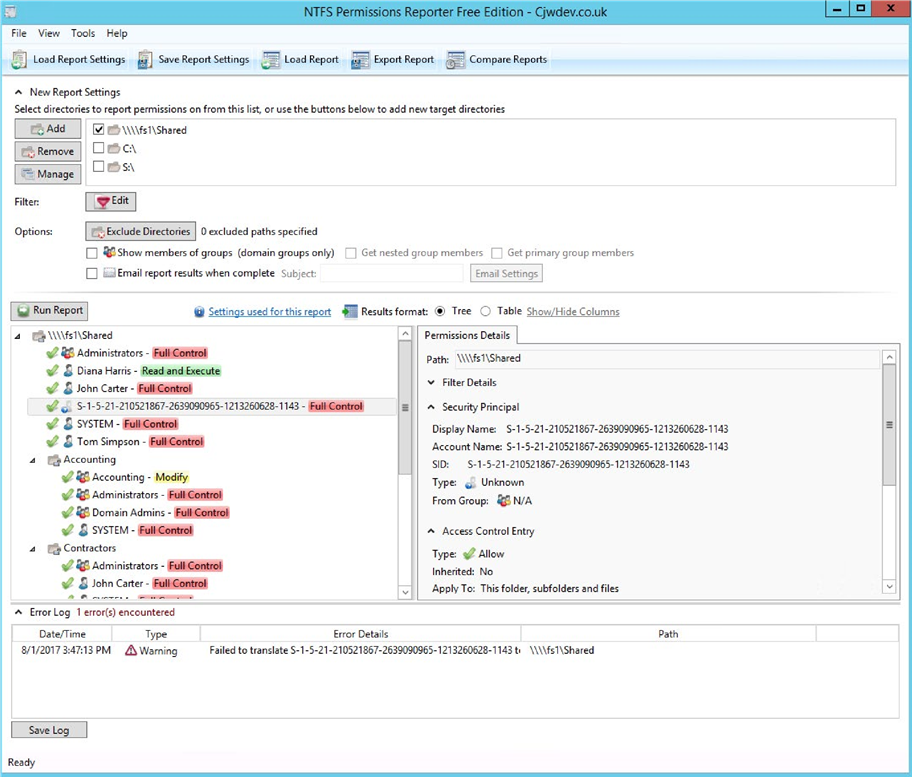
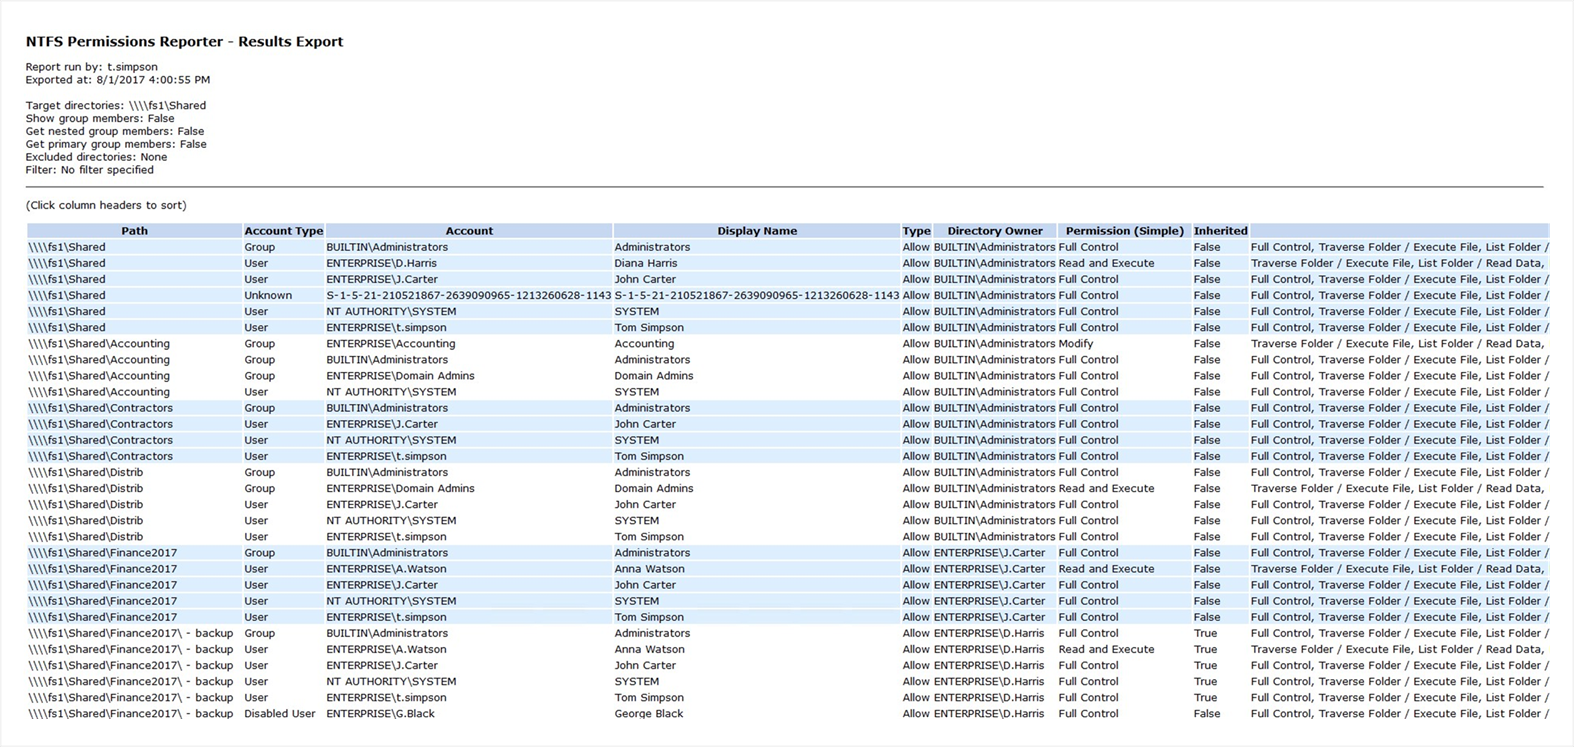
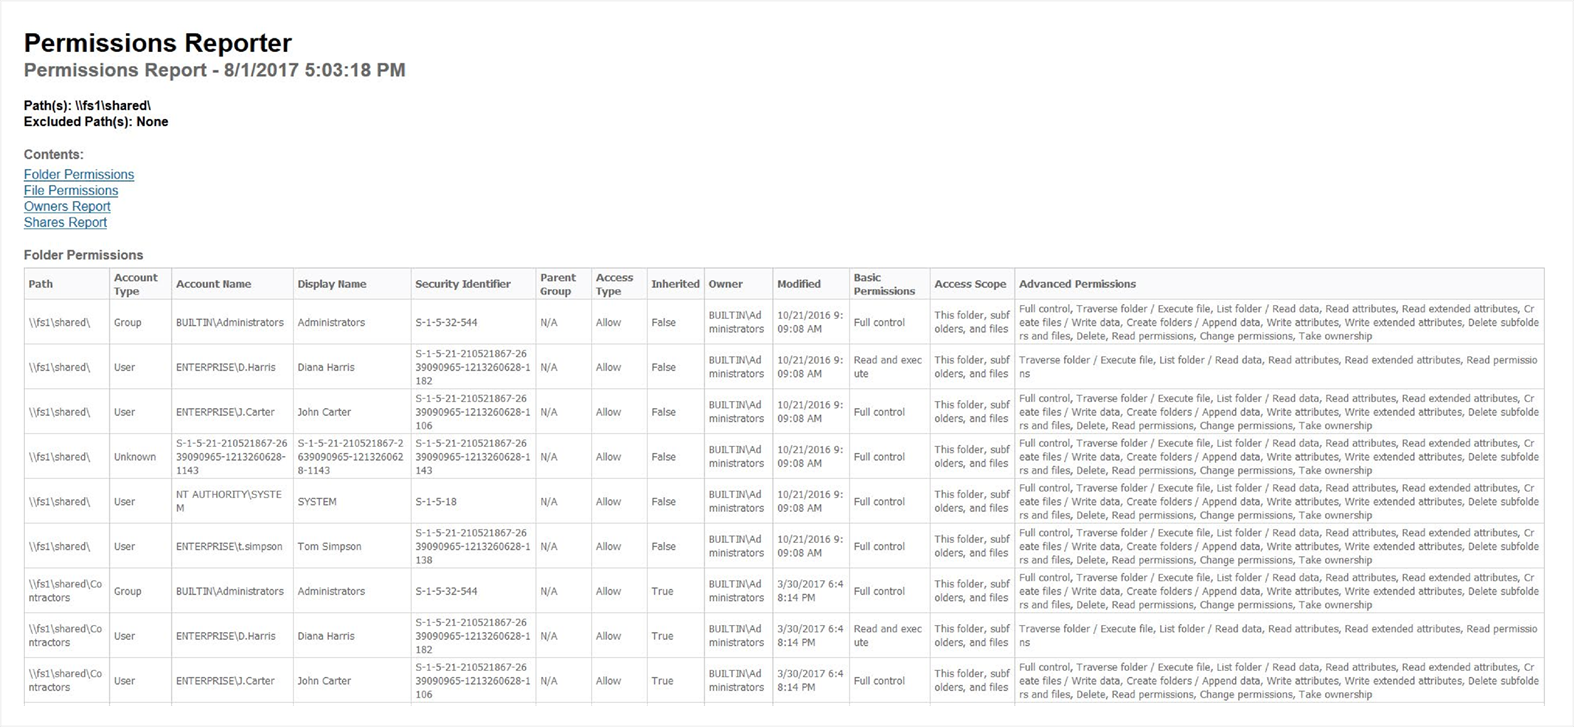
Cjwdev delivers a good tool that helps you export file and folder permissions. It displays group members (direct and nested) right in the report; plus, you can pick the report format (a tree or table) as well as highlight different permissions in different colors. Highly customizable, isn’t it? It is rather easy to use, but at first, the interface may look a little overloaded, and permission scanning may take additional time. The tool provides you with an option to easily export report results to an HTML file. However, it exports only the report on NTFS permissions to only a folder and cannot export or show permissions of a user.
Report example
 Tool #2
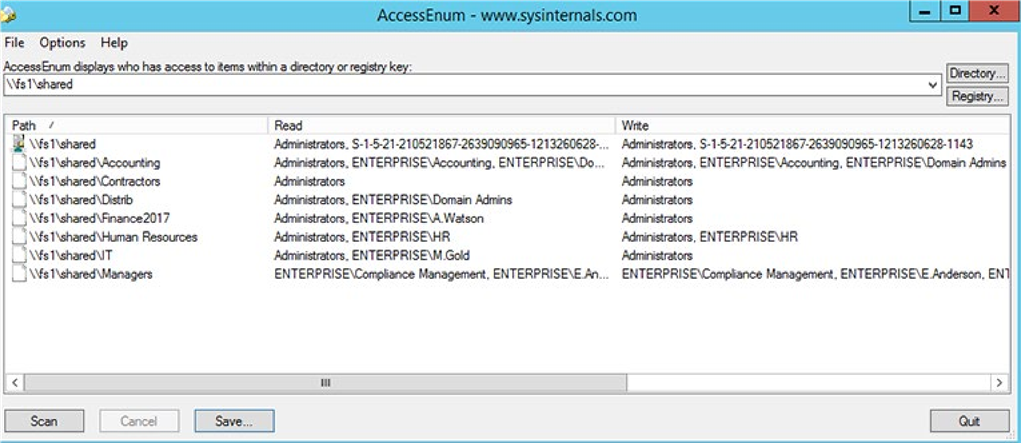
Access Enum
There’s no built-in way to quickly view user accesses to a tree of directories or keys. AccessEnum from sysinternals suite gives you a full view of your file system and Registry security settings in seconds, very simple to use, gives you table view of all permissions on your file share or registry, can export only to “.txt”
format, which is rather complicate to read, you can
Report example
copy information from “.txt” file to “.xls” manually and edit it but it will take you some time. 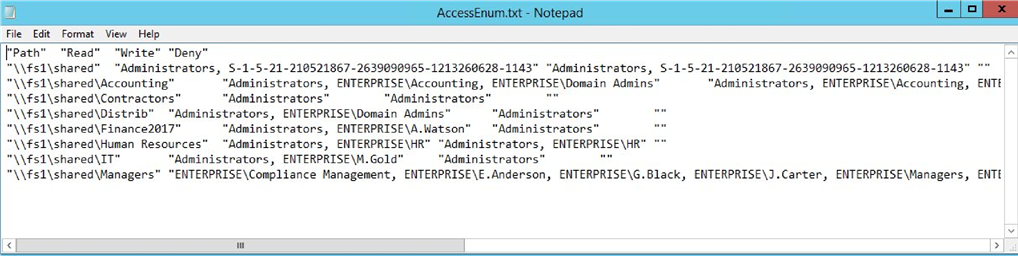
 Tool #3Report example
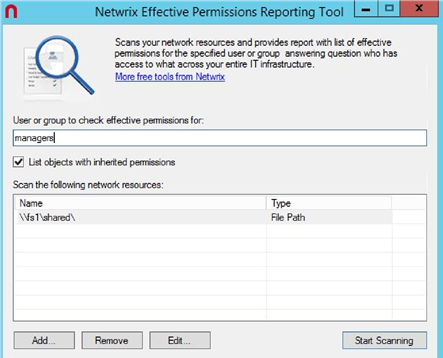
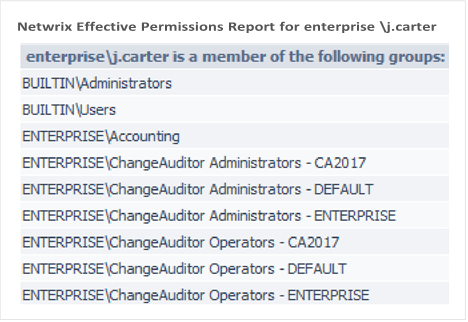
Netwrix Effective Permissions
Reporting Tool
| This tool helps you make sure that employees’ | Report example |
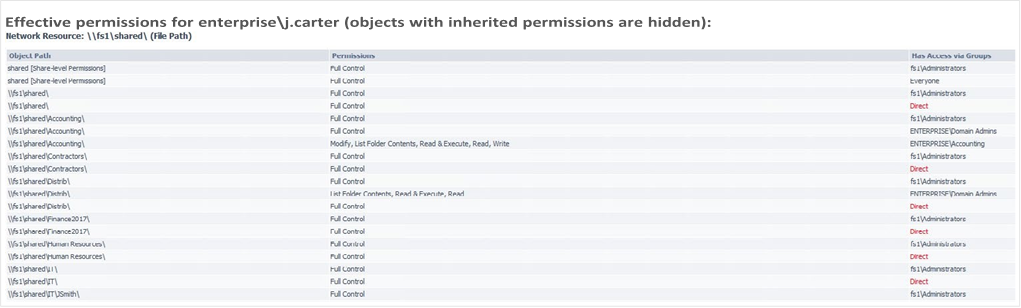 permissions align with their roles in the organization. The freeware tool delivers a file share and Active Directory permissions report that details who has access to what and how that access was gained. Very simple and easy to use tool, you just need to enter the name of a user or group to check its permissions, very fast scan and easy HTML export functionality. It doesn’t show folder permissions, such report is available in Netwrix Auditor for File Servers (20 days free trial).
 Tool #4
Permissions Reporter
This is a very good Windows NTFS permissions reporting tool. It resembles Cjwdev’s NTFS Permissions Reporter tool a little, as it has the same functionality but a prettier interface. It’s easy to use. However, permission scanning takes some time, and you can export only the report on NTFS permissions to a folder or HTML file; a report on the permissions of a user is not shown and can’t be exported.
Report example
 Tool #5
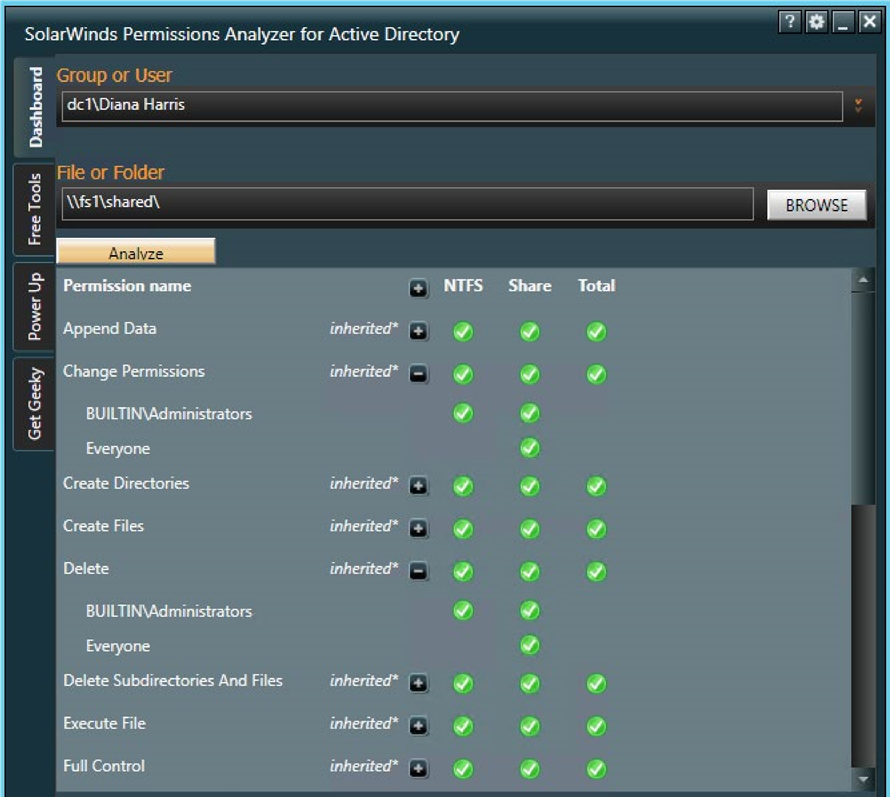
SolarWinds
Permissions Analyzer
This is the last tool in our list and the worst one, in my opinion. The main reason why I’m not fond of this tool is because you cannot export information from it, but for those who just need detailed information about user permissions, it can be rather handy. It quickly identifies how users’ permissions were inherited, browses permissions by group or by individual user and analyzes them based on group membership and permissions.
(BONUS) PowerShell
Despite all the tools on the market, you know that you can always rely on an old friend, PowerShell. Here’s a ready-to-use script for you in case you need to export folder permissions and user permissions
into “.csv” file format:
| $OutFile = “C:\Temp\permissions.csv” $Header = “Folder Path,IdentityReference,AccessControlType,IsInherited,InheritanceFlags,PropagationFlags” Del $OutFile Add-Content -Value $Header -Path $OutFile $RootPath = “\\fs1\shared” $Folders = dir $RootPath -recurse | where {$_.psiscontainer -eq $true} foreach ($Folder in $Folders){ $ACLs = get-acl $Folder.fullname | ForEach-Object { $_.Access } Foreach ($ACL in $ACLs){ $OutInfo = $Folder.Fullname + “,” + $ACL.IdentityReference + “,” + $ACL.AccessControlType + “,” + $ACL.IsInherited + “,” + $ACL.InheritanceFlags + “,” + $ACL.PropagationFlags Add-Content -Value $OutInfo -Path $OutFile }} |
 PowerShell code for exporting folder permissions:
|
|

PowerShell code for exporting user permissions: Report Example
 Tool #1
Netwrix
Account Lockout Examiner

This is a free tool that gives alerts about account lockouts and helps you troubleshoot each event and determine the root cause so you can quickly restore vital services.
The freeware enables you to do the following:

Quickly spot account lockouts
The tool scans the logs related to locked accounts and gives you the info about an IP address or computer namefrom which failed logons came. Plus, it examines mapped drives, services, RDP sessions and scheduled tasks for bad credentials.

Identify the root cause
The tool helps find the root cause of a lockout, such as improperly mapped network drives, services or scheduled tasks running under stale credentials, or  disconnected remote desktop sessions.

Unlock accounts
 Unlock accounts faster through a web-based console
  or even via email sent from your mobile device.
 Tool #2
Account Lockout
Status tools Go to pag e
e


This is a set of tools Microsoft offers to help you with account lockout troubleshooting:
 exe collects and filters events from the event logs of domain controllers. This tool has a built-in search for account lockouts. It gathers the event IDs related to a certain account lockout in a separate text file
exe examines all DCs in a domain, letting you know when the target account last locked out and from which DC. In addition, it provides the locked-out account’s current status and the number of bad password attempts
Netlogon logging
is used to track Netlogon and NT LAN Manager (NTLM) events. Enabling Netlogon logging on all DCs is an effective way to isolate a locked-out account and see where the account is being locked out. Although Netlogon logging isn’t part of the account lockout and management tools, NLParse.exe is used to parse the Netlogon logs, and
NLParse.exe is one of the account lockout tools
Acctinfo exposes more properties in ADUC (Active
Directory Users and Computers) (e.g., last logon and
password expires). Specifically, with this add-on, you get an extra tab in ADUC called additional account info that helps isolate and troubleshoot account lockouts and change a user’s password on a domain controller on that user’s site
 Tool #3
Active Directory Lockouts
This simple utility tries to track the origin of Active Directory bad password attempts and lockouts. It can search each domain/domain controller for bad password attempts to access an account. It will then parse any related events on each domain controller and work out where the origin of the lockout came from. After that, it analyzes each machine and outputs and the common causes of account lockouts that are present (e.g., mapped drives, old rdp sessions, scheduled tasks).
 Tool #4
PowerShell
Using the following PowerShell script, you can easily filter the event log for events that are related to a Using the following PowerShell script, you can easily filter the event log for events that are related to a certain account and try to figure out what caused its lockout:
| Get-EventLog -LogName Security | ?{$_.message -like “*locked*USERNAME*”} | fl -property * |
You can also use Get-UserLockoutStatus function to troubleshoot persistent account lockout problems. The function searches all domain controllers for a user in a domain for account lockout status: bad password count, last bad password time, and when the password was set last. You can find the full code here.
 Good old PowerShell is coming to your rescue!
 Tool #5
N/A
Actually I couldn’t find the 5th free tool; my bad.
However, there are some paid tools such as the
Manage Engine and Jiji account lockout tools. Algoware AD tool didn’t work in my test environment, so I have no clue what it is actually capable of doing. Maybe you can recommend one? Which account lockout troubleshooting free tool do you use?

Larry Glusman
27 years in IT

Office 365 Tutorial
Using Active Directory to
Add an Alias to an Office
365 Email Account
If you are using Office 365 with Azure AD Connect (or the older DirSync) you know that some changes to accounts cannot be made via the O365 admin portal. For instance, if someone gets married and changes their name, you may wish to add a new email address for them. If you try to add an alias (second email address) to an account, you will get an error similar to this: error
The operation on mailbox ”
” failed because it’s out of the current user’s write scope. The action ‘Set-Mailbox’, ‘EmailAddresses’,
can be performed on the object ‘
‘ because the object is being synchronized from your on-premises organization. This action should be performed on the object in your on-premises organization.
 This error has made many people think they need to keep an Exchange Server up and running on their local network.
Thankfully, that’s not the case. You can easily add an alias via
Active Directory Users and Computers (ADUC). To do this, open
ADUC and find the User you want to modify. Make sure that
Advanced Features is checked, under View on the top menu. Double click on the User then click on the Attribute Editor tab.

Scroll down to the Proxy Address field and double click to open it for editing. It may be blank, which is fine, or it may already have some information in it. If it’s blank your first step is to add the existing email account in the format SMTP:email@testemail.com. Make sure to capitalize SMTP
as that’s how the default account is determined. For the alias account you want to add, use the format: smtp:aliasemail@ testemail.com. You can add as many aliases as needed, just be sure that they all use lower case for smtp.
After entering the information, it should look something like this:

When done click OK until you are out of ADUC and then sit back and be patient. The cloud side will synchronize and show the new alias, but it isn’t always fast. You can do a manual sync via Azure AD Connect / DirSync, but even then it can take some time to appear on the O365 side of things.

Nirmal Sharma
MCSEx3, MCITP and Microsoft MVP in Directory Services

PowerShell:
Find Disabled or
Inactive Users and
Computers in AD
PowerShell is becoming increasingly more popular and is the first choice for Windows administrators to collect information from target systems. Every Windows role ships with its own PowerShell modules. Active Directory ships with more than 450 PowerShell cmdlets that you can use to collect information about every object in Active Directory, such as disabled computer accounts and disabled user accounts; interact with the ADSI engine to perform certain useful operations; check the health of domain controllers; collect GPO information; and more.
In the first part of the article, we’ll explain how you can
 use simple PowerShell commands to find disabled user accounts, disabled computer accounts, and inactive user accounts from a single Active Directory domain. The second part of the article provides a handy PowerShell script that you can use to collect the same information from multiple Active Directory domains.
How to Find Disabled Accounts Information from
a Single
Domain
Collecting Disabled Computer Accounts Information
Although Microsoft has not designed any PowerShell cmdlet specifically to collect disabled computer accounts, you can use the Get-ADComputer cmdlet. To collect disabled user accounts information, you can always use the Search-ADAccount PowerShell cmdlet, which is explained shortly below.
Get-ADComputer -Filter {(Enabled -eq $False)}
-ResultPageSize 2000 -ResultSetSize $null -Server
<AnyDomainController> -Properties Name, OperatingSystem
As you can see in the command above, we are instructing the Get-ADComputer cmdlet to look for computer accounts that have the “Enabled” property set to $False, which indicates that the account is disabled.If you wish to export the output to a CSV file, use the Export-CSV cmdlet, as shown in the PowerShell command below:
Get-ADComputer -Filter {(Enabled -eq $False)}
-ResultPageSize 2000 -ResultSetSize $null -Server
<AnyDomainController> -Properties Name, OperatingSystem | Export-CSV “C:\Temp\
DisabledComps.CSV” -NoTypeInformation
Collecting Disabled User Accounts Information
To find disabled user accounts in Active Directory, you will be required to use the Search-ADAccount cmdlet, designed to query any accounts in Active Directory. It supports a number of properties. The main parameters that you can specify in Search-ADAccount are either –UsersOnly or –ComputersOnly. When you specify –UsersOnly, Search-ADAccount searches only for the user objects, and when –ComputersOnly is specified, only computer accounts are searched. To query disabled user accounts in Active Directory, you can execute the command below:
Search-ADAccount –AccountDisabled –UsersOnly
–ResultPageSize 2000 –ResultSetSize $null | SelectObject SamAccountName, DistinguishedName
Note that Search-ADAccount supports the
“-AccountDisabled” parameter. By using the
“-AccountDisabled” parameter, you are instructing Search-ADAccount to look only for disabled user or computer accounts. If you need to export the output to a file, add the Export-CSV cmdlet, as shown in the
command below:
Search-ADAccount –AccountDisabled –UsersOnly
–ResultPageSize 2000 –ResultSetSize $null | Select-
Object SamAccountName, DistinguishedName
| Export-CSV “C:\Temp\DisabledUsers.CSV” -NoTypeInformation
| Export-CSV “C:\Temp\DisabledUsers.CSV”
-NoTypeInformation
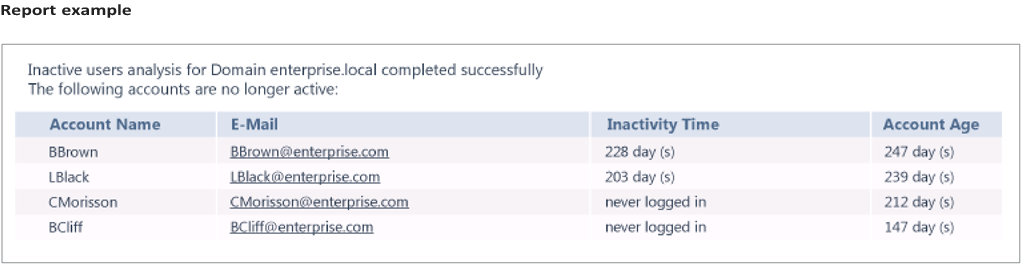
Collecting Inactive User Accounts
If you wish to find inactive user accounts in Active
Directory, you can use the Search-ADAccount cmdlet. All you need to do is use the “-AccountInActive” parameter with Search-ADAccount, as shown in the PowerShell command below:
Search-ADAccount –AccountInActive –TimeSpan
90:00:00:00 –ResultPageSize 2000 –ResultSetSize
$null | ?{$_.Enabled –eq $True} | Select-Object
Name, SamAccountName, DistinguishedName
| Export-CSV “C:\Temp\InActiveUsers.CSV” – NoTypeInformation
The above command uses the –TimeSpan parameter
to find user accounts that have been inactive for the last 90 days. The output is exported to the C:\Temp\
InActiveUsers.CSV file.
How to Find Disabled Accounts Information from Multiple
When collecting information from multiple Active
Directory domains, you need to ensure that the PowerShell script is able to loop through the each domain it finds in an Active Directory forest and then execute the PowerShell commands against the domain to collect the required information. You can use ForEach PowerShell cmdlet to execute PowerShell commands against each Active Directory domain, but you also need to ensure that the data for each domain
is collected in a separate CSV file. In a nutshell, when collecting disabled user accounts, disabled computer accounts, and inactive user accounts from Active Directory domains, you need to design a PowerShell script that can address the following needs:
 A separate IT Team for each Active Directory domain.
 A single script that can collect information from all
Active Directory domains. In other words, you need
to design a script that can be executed only once to collect required information from all Active Directory
domains.
 Ability to store disabled user accounts, disabled computer accounts, and inactive user accounts information in a separate CSV file for each domain. Once you have separate CSV files for each domain, you can distribute CSV files to the IT Team of each domain for them to take any actions.
Keeping the above needs in mind, we can use the PowerShell script below. However, before you use the script, make sure you address the requirements mentioned below:
 You must execute the script from a Windows Server 2012 or later Operating Systems.
 The current Active Directory forest name that is being used by the script is “NetWrix.Com.” You must change the Active Directory forest name in the
$CurForestName variable and then execute the script.
 Make sure to install Active Directory PowerShell modules on the computer from which you will run
the script.
 Make sure to create a directory with the name “C:\ Temp” on the local computer.
 You must open the PowerShell window in an elevated mode.
 You must have permission to access all Active Directory domains.
Once you have met the above requirements, you can execute the PowerShell script below:
| Get-ADComputer -Server $DomInFile –Filter {(Enabled –eq $False)} –ResultPageSize 2000 –ResultSetSize $null -Properties Name, OperatingSystem | Export-CSV $DisabledCompsCSV -NoTypeInformation Search-ADAccount -Server $DomInFile – AccountDisabled –UsersOnly –ResultPageSize 2000 – ResultSetSize $null | Select-Object SamAccountName, DistinguishedName | Export-CSV $DisabledUsersCSV –NoTypeInformation Search-ADAccount -Server $DomInFile – AccountInActive –TimeSpan 90:00:00:00 – ResultPageSize 2000 –ResultSetSize $null | ?{$_. Enabled –eq $True} | Select-Object Name, SamAccountName, DistinguishedName | Export-CSV $InActiveUsersReport –NoTypeInformation } |
To sum up, it is easy to understand the complete script, but just to ensure you understand the objectives of the script, the script performs the following functions:
| $DomList = “C:\Temp\DomList.TXT” remove-item $DomList -ErrorAction SilentlyContinue $CurForestName=”NWBlog.Com” $GetForest=Get-ADForest $CurForestName $Items = $R.Domains ForEach ($Domains in $Items) { Add-Content $DomList $Domain.Name } Write-Host “Starting Script…” ForEach ($DomInFile in $DomList) { $DisabledCompsCSV = “C:\Temp\ DisabledAccounts_Computers_”+$DomInFile+”.CSV” Remove-item $DisabledCompsCSV -ErrorAction SilentlyContinue $DisabledUsersCSV = “C:\Temp\DisabledAccounts_ Users_”+$DomInFile+”.CSV” Remove-item $DisabledUsersCSV -ErrorAction SilentlyContinue $InActiveUsersReport = “C:\Temp\ InactiveUsers_”+$DomInFile+”.CSV” Remove-item $InActiveUsersReport -ErrorAction SilentlyContinue |
$CurForestName variable and then stores the domain names in the C:\Temp\DomList.CSV file.
 The “C:\Temp\DomList.CSV” file is used by the second “ForEach” loop in the script.
 The script collects disabled users, disabled computer accounts, and inactive user accounts from each domain by executing the Get-ADComputer and Search-ADAccount PowerShell commands.
 The report is generated in a CSV file for each domain. You can find all CSV reports under the C:\Temp folder on the computer from which you run the script.
Once the CSV reports are generated, you can send output files to each IT Team via e-mail, or you can embed the “SendMailMessage” cmdlet in the script so the script sends an e-mail with a CSV report to each IT Team. We will talk about the “SendMailMessage” cmdlet in the upcoming part of this article series.
If you are a busy person you should try some free tools to
 The above script collects all Active Directory domains
from the Active Directory forest specified in the automate the task and safe your time. For instance, armed with Inactive User Tracker you will be able to quickly clean out or lock down all of your stale user accounts.

Jonathan Hassell
MCSEx3, MCITP and Microsoft MVP in Directory Services

3 Common Problems in Migrating to Exchange 2016
As support for Exchange 2010 wanes and the bell is tolling for Exchange Server 2007’s useful life, a lot of organizations are taking a look at moving to Exchange Server 2016. Earlier we described how to proceed mailbox move request in Exchange 2010, now let’s take a look at how to deal with three most common showstoppers for Exchange migration, i.e. namespace issues, version control, and certificate problems.
1. Namespace issues

 The migration to Exchange 2016 presents a great opportunity to consolidate some of the namespaces your company is using—that is, the domain names that you currently have in place for your users to access Exchange via Outlook’s remote procedure call (RPC) over HTTP functionality, Outlook Web App (OWA), the Exchange Control Panel, connections for smartphones, tablets, and newer versions of Outlook through ActiveSync, apps and extensions that interface with Exchange through
Exchange Web Services (EWS), the Offline Address Book
(OAB), and the Autodiscover service that helps clients automatically connect to Exchange without a bunch of confusing configuration information being required up front. Many smaller organizations combine all of those particular services under one “mail.domain.com” domain, but larger organizations, especially those that have grown up among a number of Exchange versions, might have them split apart.
Exchange Server 2016 requires that you bring all of these individual domains into Exchange if those domains are located in the same Active Directory geographical site. That’s fine for a couple of domains, but if you have six or seven, it may be a different story. You will need to prepare DNS changes (new A records or, better yet, CNAME records so that you can switch up servers without hanging new aliases out) and new SSL certificates for the services, and if you are using load balancing, you will need to switch up that profile as well.
Perhaps this is a great time to consolidate namespaces for your organization to make the migration much less
complex?
2. Outlook (on the desktop) version control
The version of Outlook installed on the desktops that your clients use may very well drive your migration timeline. Outlook 2003 and 2007 cannot connect to Exchange Server 2016, namely due to the Autodiscover service that changes how it responds to client requests in 2016 in a way that these older versions of Outlook do not currently understand. These desktop versions of Outlook will not be updated to work with Exchange
2016. Interestingly, you can still use Outlook 2007 with Office 365, even though Office 365’s Exchange version is based on the 2016 product, but that could change at any time.
For larger organizations, this will generally mean running a parallel Exchange 2007, 2010, or 2013 operation while introducing some Exchange Server 2016 machines into the mix as well as scheduling user migrations for those clients who are already on later versions of Outlook for the first wave of migrations. For smaller shops, this may mean you focus on upgrading Office first before you proceed down the migration path. To get those stragglers on your new Exchange environment, you will need to also schedule them for Outlook upgrades or relegate them to using their mobile devices and Outlook Web App (ahem, excuse me, “Outlook on the web”).
Additionally, read: how to detect who accessed a shared mailbox in Office 365 in order to secure your data from being stolen.
3. Certificate problems
One of the most common issues you will encounter during or
just after a migration is a certificate error on your clients. This mainly relates to the fact that Exchange, during installation, registers a service connection point (SCP) in Active Directory for the Autodiscover service, but it registers using the server’s actual domain name and not an alias for the service that you may have chosen (and may have used to register and purchase the certificate you are using from a trusted third party certification authority). You will need to switch this SCP registration for the domain name you used in the certificate so that they match, and the warning will go away.
The fix is a quick PowerShell command away. First, see what the current SCP registration domain is:
Get-ClientAccessService -Identity
YOUREXCHANGEMACHINE | Select
AutodiscoverServiceInternalUri
Then, change it to the one that matches your certificate namespace. In the following example, I’ll assume you have consolidated your namespaces into the generic “mail”:
Set-ClientAccessService -Identity
YOUREXCHANGEMACHINE
-AutoDiscoverServiceInternalUri https://mail. yourdomain.com/Autodiscover/Autodiscover.xml
Restart internet information services (IIS) on the affected machine just for good measure.
| Free Tool of the Month Netwrix Inactive User Tracker
|


 Freeware tool that facilitates Active Directory user account management by providing insight into stale user accounts across your IT environment.With this information at hand, you can take steps to prevent inactive accounts from being compromised by malicious actors.